Self-publishing books with Blurb.com. How to get started, a user’s experience.
Introduction.
In mid-2008, I was fortunate enough to spend 10 days in some of the great wildlife reserves and national parks of Tanzania photographing the landscapes and some of the renowned wildlife of the region. It was a memorable trip and photographically productive as well allowing me to get numerous pleasing images.
The question following such a trip is what to do with all those images? Well in my case I was already using the internet as a means of displaying pictures via this website/blog, and I was already producing prints that I was pleased with too. But another option was now available, a self-published coffee table-style photo book. Thanks to the internet and its ability to transfer image files and more, companies such as Blurb.com have come into existence with the promise of straightforward, quality, affordable book publishing.
How does it work?
The blurb process is based on the use of template designs using the company’s free downloadable “Booksmart” software, which is available after a simple registration procedure. I found that downloading and installing the software was quite straight forward and the computer system requirements (see appendix) were no more demanding than for many other software packages.
The starting point with the application is the “new book wizard” which guides you through the basic parameters including the selection of book size that you intend to produce, with sizes between 7×7 (inches) and 13×11 being available. From there you get into the Booksmart application interface where the content and layout decisions are made.
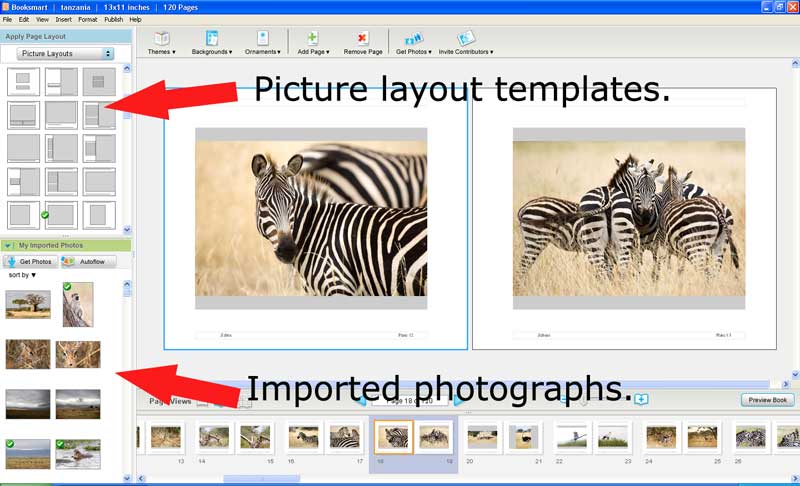
The following screen capture shows the Booksmart application in use in the “Edit book” mode.
Layouts
There are numerous picture and text layouts available as templates via a scroll-down display, simply click on a template that looks good to you.
Importing photographs is fairly straightforward as well, click on the “Get Photos” button and you can then bring photos in from your computer’s hard drive or from other sources such as a Flickr account. Once the photos have been imported they can then be placed into the template via auto-flow, where the images are placed in their imported order into the layout automatically by the software. Or the user can drag and drop the images into the template in the order of his choice. Once an image has been placed into the template a green marker appears on that image in the imported photos library so you can keep track of which images have or haven’t been used.
With the images positioned in the layout, the sequence of pages and images can be seen in a filmstrip view at the bottom of the page. Navigating from page to page is easy by clicking on the filmstrip. The layout window and imported photos library, as well as the filmstrip, can be resized within the application by clicking and dragging the edges. Also, the template page can be zoomed in or out and viewed either one page at a time or as a double-page spread as shown here. Adding pages to, or removing pages from, the book design, can be done via the buttons at the top of the application window.
Page Preview
Having prepared the pages in the “edit book” mode you can then get a better idea of what the finished product will look like by switching to the “preview book” mode shown in the next screen capture. In this mode, the layouts window and imported photos library are hidden, as are the template bounding boxes on the pages themselves.

In the “preview book” mode the pages can still be seen either as individual pages or as double spreads. The zoom controls are still available and it’s possible to cycle through the pages to approximate the experience of turning the pages of the book. During production and editing, I found that I frequently clicked from one mode to the other to check on the appearance of the pages, this became particularly important later in the process when it came time to provide footers and page numbers.
The use of text.
Whenever a text dialogue box was in use, a toolbar was present similar to what you would expect if you were using a text editing program such as Microsoft Word, with controls for various fonts, text size, colour, underlining, etc. In the event that you had compiled some text in another program, you can simply copy the text from that other program and then paste it into a text dialogue box within Booksmart, simple.
Preparation of images.
Given that my book was going to be very much a showcase for my photography, the preparation of the images was a key consideration. The whole issue of quality image processing needs to be addressed independently of the Booksmart process. It’s worth learning about and understanding the fundamentals of colour management, not just in preparation for publishing a book such as this but indeed in order to get quality results in any form of photographic output.
Monitor profiling.
One of the first things is to ensure that your computer monitor is giving you consistent, reliable colour output. Computer monitors, like televisions, don’t necessarily display well straight out of the box. They need to be “tuned” for the best result. Ever gone into an electrical goods store and seen a wall of televisions all playing the same show? Chances are you noticed wildly different picture quality, some televisions having poor contrast, others having “off” colours. If they were all tuned well, they’d all look fairly similar. Likewise, computer monitors can vary in how well they display, not only that but the performance of the monitor can change over time as well.
This means that colour calibration of the computer screen is essential for any serious digital photo processing. I use a ColorVision “Spyder” for this purpose. (There are similar products produced by other companies as well.) The Spyder is placed on the monitor screen and measures a series of colour swatches that are displayed via the associated software. At the conclusion of the Spyder’s analysis, a monitor profile is stored in the computer and via that profile, the screen colours are modified so as to display correctly.
Image size and colour space.
Prior to importing the pictures into your Booksmart image library, it’s worth thinking about just how many images you intend to use and what size they will need to be in order to work well with the software. Blurb indicate that images used should be jpegs at a resolution of 300 dpi. The required size of the images will depend on the size of the image area in the template you’re using. This can be established by hovering your cursor over the image container in your Booksmart template, the “optimal photo size” will be displayed in pixels for height and width. Use these figures as your minimum dimensions, if the image is not large enough, the quality will be lost as Booksmart attempts to upsize it to the template. If the image is larger than required, then Booksmart can downsize it accordingly. It makes sense not to make the images much larger than required as this will make the file sizes unnecessarily large and add to the upload time.
We also need to be mindful of the colour space being used, sRGB. If your images were originally captured as jpegs or have already been converted to the jpeg format then they will be in the sRGB colour space. If however, your images are on your hard drive as TIFF or PSD files they are likely to be in a different colour space such as Adobe RGB. The significance of this is that the colour gamut of these different colour spaces is not the same, sRGB cannot display the range and intensity of colours that Adobe RGB can, therefore an image that is satisfactory in the broader colour space may be less satisfactory in the reduced colour space that is sRGB.
Softproofing.
In addition to the colour space issue, there is a further variable. The final printed output of an image can vary depending on what type of printer is used and what type of paper is used. For this reason, the manufacturers of inkjet printing papers provide profiles for use when printing on their particular papers and using specific ink types. The concept is similar to that discussed earlier regarding monitors. The print profile is designed to ensure that the colour values coming out of the computer are reproduced accurately in the print.
Blurb uses the HP Indigo 5000 printer, therefore it makes sense to soft-proof using the profile applicable to that printer. Fortunately, the profile is available for download via bonsai-photography.com. With the HP profile loaded into Photoshop, the profile can be selected via View/Proof Setup. Then to see the effect of the profile, ie: soft-proofing, use the “proof colors” command with the keyboard shortcut Control(Command) +Y to toggle the effect on and off to see the difference. With the profile applied, carry out further image adjustments to get the desired result. Typically the image will need a little more contrast and an adjustment to colour saturation as well.
Hard proofing.
A further step that I would recommend in addition to soft-proofing, is to hard-proof as well. No matter how well we soft-proof and process the images, the printed image will never exactly match the image on the screen. The reason is that the two forms of display are fundamentally different. The image on the printed page is visible because of the light which is reflected off the page, it is in effect front-lit. The computer screen provides its own illumination, in effect the image is backlit. It’s like comparing a photographic print with a photo transparency, they have different qualities, a different luminosity to them. For this reason, I think it’s a smart practice to prepare a scaled-down version of your blurb book in order to check the print qualities/values. Select a handful of images that represent the extremes of what you intend to use in the final product, say a monochrome image if you’re using any, a high contrast image, a low contrast image, images with different colours represented, and so on. Using crops of your images so as to maintain the same dpi values, a 10 or 15 page 7×7 book can be produced as a hard-proof or trial print at a reasonably low cost and provide you with a valuable guide prior to committing to the expense of the full book print.
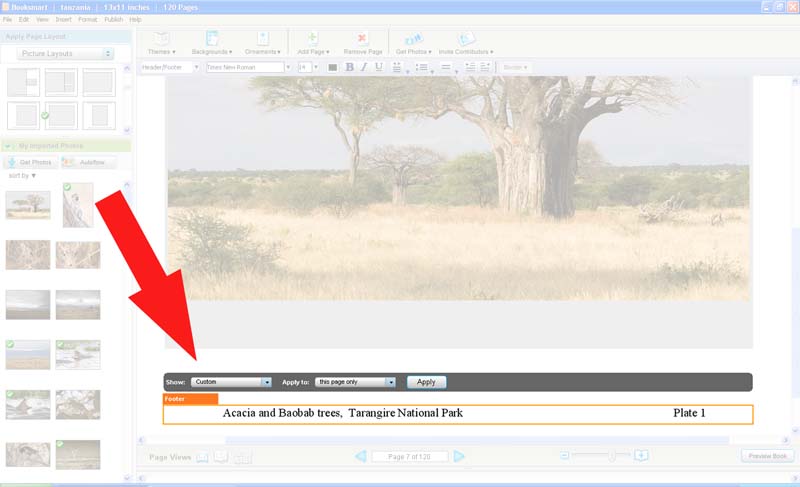
Headers, footers, and page numbers.
In addition to the text and images, I used page numbering for the introduction and photographic notes pages which were fairly straightforward. I also used captions and plate numbers for each of the image pages by use of footers. I found this to be probably the most frustrating aspect of using Booksmart and it took up an inordinate amount of my time. The only way I could achieve the consistency I wanted was to continually switch back and forth between the edit and preview modes tweaking the entries with a space here or a tab there to get to where I wanted. My only advice here is to have some patience and get up and walk away from the computer occasionally, yelling at the computer doesn’t help in my experience!
Proofreading.
Once you’ve got your book to the point where you are about to commit by uploading the project and ordering the finished product, go into preview mode and proofread, every page, every caption, every page number. Then get a good night’s sleep and come back to the project and repeat the entire proofreading exercise again.
Ordering your book.
Once you’re sure you’ve got it all right, ordering is as simple as hitting on the order button in Booksmart and following the prompts. Once you have your account set up there are several nice features available to you including the setting up of a pdf preview, the ability to offer the book for sale to interested readers, setting your sale prices, and so on. I won’t go into all this in detail, it’s well explained on the Blurb site.
Cover types and paper choices.
The books are available in a choice of a softcover (for books smaller than the 13×11), hardcover with dust jacket, or hardcover with image wrap. I chose to produce my book as a 13×11 hardcover with a dust jacket and also as a 10×8 with a softcover. Looking back through the Blurb user forums, some of the earlier entries questioned the quality and durability of the bookbinding, these concerns appear to have been addressed and the binding of my finished books was excellent. There are also two different paper types available, the “standard” paper and the “premium” paper. The “premium” paper is, as its name suggests, a little more expensive and is heavier as well. Whilst there’s nothing wrong with the standard paper, the premium paper is certainly superior and worth the extra expense.
Packaging and shipping.
My books arrived in good condition in their cardboard pack. The pack is designed so that there is adequate corner protection and several layers of cardboard over the face of the book. (Not shown in this picture, but the book was originally sealed in lightweight plastic within the cardboard pack)

Shipping costs vary depending on shipping destination and required speed of delivery, obviously the further it has to ship and the faster it’s required the more it costs. The shipping costs are quoted at the time of ordering and dependent on your requirements can be a significant expense. My books were, I believe, printed in Europe and sent to my address in Australia “economy” class delivery. Blurb estimated that printing could take about 5 business days and subsequent shipping 7-15 days so a total of about 4 weeks which was about right. It should be noted that any orders leading up to Christmas should be placed earlier due to increased demand and postal traffic at that time of year.
The finished book.

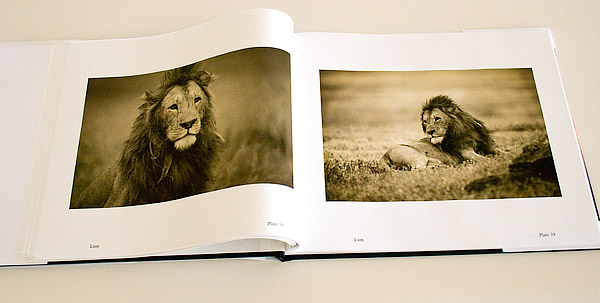
I found that monochrome images, in my case toned monochromes, printed very nicely. Obviously, the colour management issues aren’t quite as challenging in this case. Worth pointing out that the design of one photograph to a page with just a simple caption and plate number was the look that I deliberately set out for.
The layout that you choose for your book could be wildly different in design to this, there is the possibility of virtually any combination of images and text you wish, the only limit is your imagination.
The Economics of Publishing.
How many paths are there to publishing a book? Traditionally an author would prepare a manuscript and trek off to a publishing company and try and convince them that their book was worth printing, marketing and distribution. In other words, that the book could be a good seller for the publishing company. The key here is that the publisher needs to be convinced that large volume sales are likely and for that, the author will likely receive a comparatively small percentage of the proceeds.
Another path is through self-publishing. There are companies, often set up in countries such as India or China to take advantage of a lower cost structure (read; lower wages), who can carry out relatively small print runs, say 100 to 1000 books, ship them to the author who then takes on the task of marketing, distribution, and sales himself.
The major cost in such an arrangement is setting up the printing of the first completed book. Once the set up is done, the cost of subsequent printing is not that great so an economy of scale is achieved. Producing 100 books at a total cost of say $10,000 works out at $100 per book making it highly unlikely that the author will recover his costs through sales. However producing 1000 books at a total cost of say $15,000 works out at $15 per book, the economy of scale effect. If the author can sell his books at say $40 each then he’s on a nice little earner, the key being of course that the author has to be fairly confident of moving that many books. This would be quite an undertaking, with a considerable financial outlay on the line, I take my hat off to anyone who can take it on and make it work for them.
This brings in the next possibility which of course is the single book, or a handful of books, at a time approach possible via Blurb and other online publishers. In this model, the first book can be compiled via an online system without any initial setup costs with a book costing anywhere between $13 for a 7×7 book of 40 pages to about $90 for a 13x11book of 120pages with higher charges for additional pages and variously priced options on paper type, cover type and so on. In the event that you purchase several copies at one time a modest per unit saving is made, but nothing like the “economy of scale effect” previously discussed.
Can you make a profit via Blurb publishing?
This question is posed occasionally through discussion forums, along with, how many books has anyone sold? The Blurb system allows the user to publish his book, make it available for purchase by the public, and set his own selling price and hence profit margin, so theoretically at least a profit can be made. In reality, the per-unit publishing cost puts a book near or beyond what the retail price of a similar quality large print run book might be in a conventional book shop, the economy of scale effect again. In a nutshell, the “Blurb” model is, in most instances, not profitable to the author.
Who does this publishing model suit?
This style of publishing has opened up the possibility of true, high-quality, book authorship to anyone who has an internet connection and the desire to express themselves in print. No longer is there a need to win the approval of a traditional publisher nor spend a small fortune on self-publishing and then hope you can sell hundreds of books in order to recoup the costs involved. This model allows the author almost unlimited creative freedom and the opportunity to produce something quite individual which he can proudly put his name on. In addition to the individual author, there is also scope for a group of like-minded people to contribute to a group project, such as a camera club, or high school, yearbook for example.
The end of the traditional photo album.
In the “pre-digital” photography days it was not uncommon, particularly if you’d been travelling somewhere interesting, to end up with hundreds of postcard-sized photo prints which you then placed into albums and stuck on a bookshelf where they gathered dust. In my own case, I have a bookcase full of albums containing roughly 10,000 pictures, some of them good, some not so good, and of course I’m not counting those that went into the rubbish bin years ago.
With the Blurb publishing system, I can now gather together a collection of digital images and arrange them into a quality coffee table book. As its name suggests, the “coffee table book” now has pride of place on the coffee table where visitors to my home can freely pick it up and browse (and of course be suitably impressed!). In this digital era, it’s easy to display images via the internet and that certainly has its place, but nothing quite matches the effect of picking up a well-conceived and executed photo book.
With the internet, you accept that your audience has a very brief attention span, (if you’ve read this far into this article, thank you!) the viewer will glance at a page, glance at an image, and move on immediately, sometimes without ever appreciating what it is they’ve just looked at. With a book there is the tactile experience of turning the pages and actually looking into the images, even studying the images and therefore getting a true appreciation of what they’re about.
Conclusion.
Would I recommend self-publishing via Blurb.com? Certainly. I almost certainly will publish through them again if only for the “photo album” concept I discussed last paragraph. There are a number of technical points, as discussed above, that need to be borne in mind if you’re to get the best out of it, and don’t expect self-publishing to replace your day job for income.
Kevin Dowie, April, 2009.
*** The finished book “Tanzania, a photographic collection” by Kevin Dowie can be previewed as a 15-page pdf at: (Blurb.com) ***
The views expressed above are those of the author and have not been vetted or endorsed by any of the companies, organizations or individuals referred to. The author does not have any proprietary interest in nor commercial affiliation with any of these parties other than as acknowledged in the text.
Article, text, and illustrations copyright Kevin Dowie 2009. Layout revised September, 2010.
Appendix.
Further reading and useful links:
Blurb.com for full details regards Booksmart software, publishing, and ordering. The site has a user forum and also comprehensive “how-to” videos and guides.
Color Management & Calibration From Blurb with useful advice and the recommended ICC profile for soft-proofing.
“Producing your own book” an essay by Michael Reichmann at Luminous-Landscape.com explores his experience in small-run publishing. Datacolor marketer of the ColorVision “Spyder” monitor calibration tool.
“The role of working spaces“ a technical article at Adobe.com gives an in-depth discussion regards sRGB and Adobe RGB colour spaces and their use in digital imaging.
Blurb “Booksmart” software system requirements:
System Requirements For Windows Blurb BookSmart™ Version: 1.9.9 released January 29, 2009
-
-
-
Operating System: Microsoft Windows XP and Vista (32-bit)
-
Memory: 512 MB minimum, 1 GB or more recommended Processor: 1.3 GHz minimum, 2 GHz or faster recommended
-
Download Size: 35MB Disk space to install the application: 140MB
-
Open disk space required to run BookSmart: 1GB Disk Space per Average Book: 100MB
-
Screen Resolution: 1024×768 minimum, 1600×1200 preferred
-
-
System Requirements for Macintosh Blurb BookSmart™ Version: 1.9.9 released January 29, 2009
-
-
-
Operating System: Mac OS X 10.4.5 or later
-
Memory: 512 MB minimum, 1 GB or more recommended (especially for PPC Macs) Processor:
-
1.5 GHz G4 minimum, 1.83 GHz Intel Core Duo or faster recommended
-
Download Size: 35MB Disk space to install the application: 67MB
-
Open disk space required to run BookSmart: 1GB Disk Space per Average Book: 100MB
-
Screen Resolution: 1024×768 minimum, 1600×1200 preferred
-
-
The above information as originally published by Blurb.com, (Copyright Blurb.com) original source: http://www.blurb.com/create/book/